Posts

Showing posts from January, 2021

rpm to rps - UNIT CONVERTER

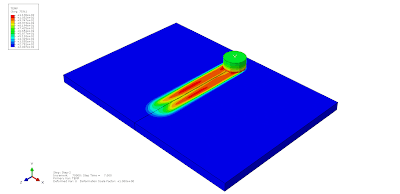
RPM to RPS Unit Converter Convert Introduction: When it involves measuring the velocity of rotating objects, of the maximum generally used gadgets of dimension are revolutions in step with minute (RPM) and revolutions in step with second (RPS). Both of those gadgets are utilized in quite a few applications, from engineering and production to physics and mechanics. If you`re operating with rotating objects, it is vital in an effort to speedy and appropriately convert among RPM and RPS. In this article, we will speak the blessings of the usage of a dependable RPM to RPS converter, and why it is so vital to recognize the connection among those gadgets. Q: What is the distinction among RPM and RPS? A: The major distinction among RPM and RPS is their unit of dimension. RPM is a unit of rotational pace this is generally used withinside the production and engineering industries. It measures the wide variety of complete rotations an item makes

g/cm3 to tonne/mm3 - UNIT CONVERTER

g/cm³ to Tonne/mm³ Unit Converter Convert Introduction: In the sector of technology and engineering, know-how density measurements is crucial. Two of the maximum broadly used devices of density dimension are g/cm3 and Tonne/mm3. While g/cm3 is a metric unit of density, Tonne/mm3 is a unit of density used withinside the global device of devices (SI). In this article, we`ll discover the g/cm3 to Tonne/mm3 unit converter and the entirety you want to understand approximately changing g/cm3 to Tonne/mm3. What is g/cm3 (Grams in step with cubic centimeter)? g/cm3 (Grams in step with cubic centimeter) is a metric unit of density. It is described because the mass of an item in step with unit volume. This unit of density is normally used in lots of distinctive fields, which includes physics, chemistry, and substances technology. What is Tonne/mm3 (Tonnes in step with cubic millimeter)? Tonne/mm3 (Tonnes in step with cubic millimeter) is

abaqus thermal analysis temperature contours in fsw

Image
hi abaqus students. In this post we will see how to get temperature contours in all the objects under analysis in abaqus software. Generally friction stir welding analysis is while doing in abaqus software when you want to get the temperature contour for the temperature result most of the temperature contour is only visible on the tool surface.This is because abaqus software represents the place where the highest temperature is seen.This is caused by overheating of the tool surface.This temperature change depends on what kind of material properties we use.We can get temperature contours on both plate and tool surface using the following procedures. 1) First click on the plot contours on deformed shape icon in the side menu icons on the visualization page.Then change the field output dialog box to temp (temperature). 2)Then click on the create display group icon.Clicking on the create display group icon will create a new tab. 3) I

abaqus white background and mesh removing

Image
hi Abaqus students. In this post, we will see how to bring a white background in Abaqus software. 1) Click on the view menu in the top menu bar on the main page of Abaqus software. 2) After clicking on the View menu, a new mini tab will appear below the view menu. In the new mini tab, click on the graphics options. 3) After clicking on the graphics options a new mini tab will be created. In the new mini tab, select solid in the viewport background. 4) Then click on the box nearby solid. Clicking on that box will create a new tab called select color. 5) In the new tab called select color, if we select the color (ex; white color) and give ok that color (ex; white color) will appear on the main page of Abaqus software. 6) By changing this you can get results and page-like part creation on white background. abaqus mesh removing In this part, we will see how to

abaqus double viewport

Image
hi Abaqus students. We will see in this post how to get double viewport in Abaqus software. In Abaqus software, we sometimes have to compare the results we get with another result. A double viewport can help us in such cases. Before doing this we need to enable the viewport menu. For that, you need to click on the view menu in the top menu bar. Clicking on it will create a new tab. Move the cursor to the toolbar menu in the new tab to enable viewport (view> toolbar> viewport). Once the viewport is enabled, a new menu bar will appear. In this new menu bar, first, click on the create viewport icon. Next, click on the third or fourth icon in the menu bar to change the single viewport to double viewport. Clicking on the third icon will create a horizontal viewport. Clicking on the fourth icon will create a vertical viewport. Thus we can get another new result in the second viewport by clicking on the second viewport that is created and selecting another

graph result in abaqus

Image
hi Abaqus students. We will see about getting graph results in Abaqus software in this post. Once the simulation we have created is complete, click on the resulting menu. After clicking on the resulting menu, the visualization page opens. Click on the x, y create data icon, which is the eleventh icon from the top to the bottom of the side menu icons of this visualization page. This icon is written in red as x, y with some grid. Clicking on this icon will create a new mini tab called create x, y data. It will have the ODB history output menu tick. Click on continue without making any changes to it. Once clicked, the graph format menu for various results will appear in a new tab. Select the graph result we want and click on the plot option to get our graph view. The resulting graph result can be saved as an image file in png format or any other format by clicking on the print icon.Also, if you click on the animated time history icon in the side me

abaqus cad file import

Image
hi Abaqus students. In this post, we will see how to create cad software like CATIA, Solidworks, and import the cad file in Abaqus software. When we work in Abaqus software we sometimes have to create the most difficult design. For example, creating a helmet-like design in Abaqus software is not an easy task. This is because the number of tools provided for drawing in Abaqus software is small. In such cases, we can create that difficult design using some other cad software and we can import and use it in Abaqus software. That is, after creating a cad model in CATIA software, we need to click on the File menu in the top menu bar of CATIA. A new tab will be created from that file menu. In that tab, click on the save as menu. Clicking on save as will create a new save tab. In it we have to select in which folder (left side) the cad model we have created should be saved. To make sure that it is saved in the folder we have selected, the top layer of this tab w

abaqus results save

Image
hi Abaqus students. We will see how to save the results in Abaqus software in this post. When the project we have worked on is submitted and completed, we get the results button. Click the results button. Clicking on the results button will take you to the visualization page. This visualization page will have a plot undeformed shape icon select by default in the sidebar icon. In this case, the object we created will be green. We need to move the cursor button and select the plot contours on the deformed shape icon under the plot undeformed shape icon. The icon comes in a variety of colors including red, yellow, green, and purple and it's like L is slightly curved. In this case, the object we created will appear as a multi-colored object from the green. On this page, we select the print icon just below the top menu bar (file, model, viewport, view, etc). This icon is located just below the model button in the top menu. Clicking on th

bar to GPa - UNIT CONVERTER

Bars to Gigapascals Unit Converter Convert Introduction: In the sector of engineering and physics, expertise stress measurements is crucial. Two of the maximum broadly used devices of stress size are bar and GPa. While bar is an atmospheric stress unit, GPa is a metric stress unit this is used for high-stress applications. In this article, we`ll discover the bar to GPa unit converter and the whole lot you want to recognize approximately changing bar to GPa. What is Bar (b)? Bar is a unit of stress this is normally used withinside the atmospheric stress range. It is described as 1 bar = 100,000 Pascals (Pa). The bar is broadly used in lots of special fields, inclusive of climate forecasting, fluid mechanics, and meteorology. What is GPa (Gigapascal)? Gigapascal (GPa) is a metric unit of stress this is used for high-stress applications. It is described as 1 GPa = 1,000,000,000 Pascals (Pa). GPa is frequently used withinside the fi

bar to MPa - UNIT CONVERTER

Bars to Megapascals Unit Converter Convert Pressure units play a crucial role in various scientific and industrial applications. Bar (symbol: bar) and MPa (megapascal) are two commonly used units to measure pressure. If you find yourself needing to convert between bar and MPa, this article is here to help. We will walk you through the process of converting bar to MPa and vice versa, provide step-by-step guides, and explore additional pressure unit conversions using a unit converter. So let's dive in! 1. Introduction When working with pressure measurements, it's essential to understand the different units involved. Bar is a unit of pressure derived from the CGS (centimeter-gram-second) system, primarily used in Europe. On the other hand, MPa is a unit derived from the SI (International System of Units) and is widely used globally. 2. Understanding Bar and MPa as Pressure Units Before we delve into the conversion process, let